Wednesday, July 20, 2011

Cake Pops

I was grocery shopping with my little boy and stumbled across a book about Cake Pops.  I was mesmerized.  What a marvelous creation.  They can range from super simple to extremely intricate.  I did a little googling and found out a woman named Angie Dudley, aka www.Bakerella.com, created them and I really suggest you visit her website to witness tons of fun little Cake Pop ideas.

I was hooked and decided to try my hand at making something new.

There are lots of official recipes available, but here is the gist.

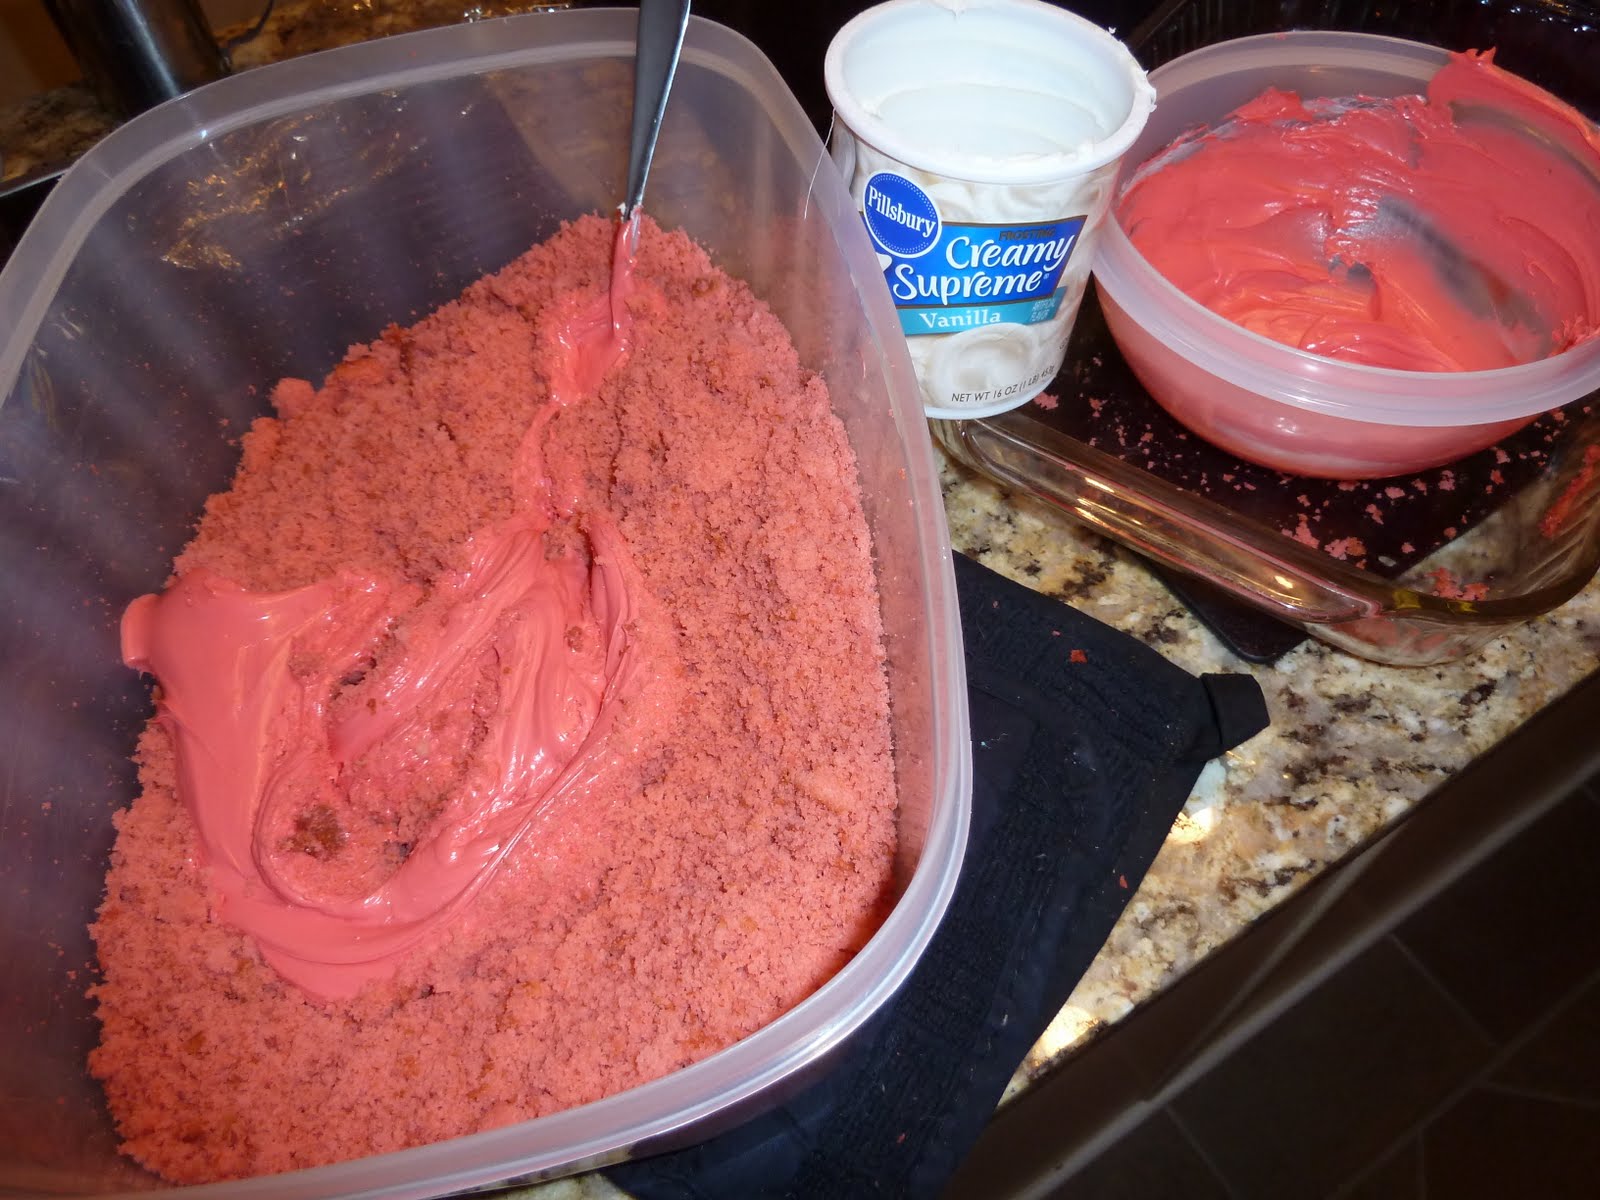
First bake a normal cake and crumble it to bits.  I have to say, that part was actually kinda fun.
Then blend most of a container of pre-made frosting to a playdoh consistency.


Roll mixture into balls and poke in a lollipop handle.
Stick in the freezer for a bit to make the cake firm.


Melt chocolate of desired color and coat the entire cake pop.
Decorate as desire.  I used a food pen to draw on my pops, but lots of the designs I saw had candy and other food bits stuck to the chocolate before it completely dried.

They were so much fun and easy to make.  For my first attempt I decided to go uber easy, but the sky is the limit on all the possibilities.

Wednesday, July 13, 2011

Fun time flocking

I learned about the wonders of flocking last weekend at a Scrapbooking Expo!  Where in the world have they been keeping this wondrous little secret?  I thought this was a whole new product that was bursting onto the market, then I discover it has been around for years!  Where was I?  It is much like an embossing powder but it actually makes things fuzzy. 

I have no particular reason to make a card, I just really wanted to make a fuzzy little critter.
  
Front:
Precut cream colored 5x7 card
Cardstock: green pattern paper (sort of a grassy appearance), cream
Cricut Cartridge: Create a Critter
-pg 69 Fawn cut at 3.5"
Embellishments: brown ribbon, generic flower gemstones
Stamp: My Pink Stamper - More Punny-licious: you're a deer
Tim Holtz Distress Ink - Tea Dye
Funky Flock: Milk Chocolate, Bow-Wow Brown

Here is an extreme closeup of the the fuzzy flocked little deer.  Isn't he just sweet and amazing...
When using attaching multiple flocked layers, be sure to use a strong liquid glue or you may get an undesired layer separation.

Friday, April 29, 2011

Teacher Appreciate Week Card II

Here is the second card designed for my little boy's PreK Teachers.  It is Teacher Appreciation Week at the school and I wanted to make something extra special.

Flowerbox Card
Precut cream colored A2 Card (4x5.5)

Front:
Cricut Cartridge: Everyday Pop-Up Cards
-pg23 Phrase and Phrase Layers: Showering Thanks cut at 1 1/4"
ProvoCraft Slab III: diamond patterned paper
cardstocks: black, light blue, light green, second shade of light green

Inside:
Cricut Cartridge: Everyday Pop-Up Cards
-pg48 Pop-Up: Flowerbox cut at 5" (I watched carefully and stopped Cricut from cutting the flower stems from the pop-up.  I did not want to deal with flower stems moving around in the middle of the pop-up box.  I wanted them to stand up straight and be more predictable and stable.)
Flowerbox, shift Flowerbox and all flower layers (not shadow) cut at 2 3/4"
Cardstocks: brown, DCWV glitter brown, green, pink, yellow, blue
Stickles: Crystal


I also used the "bomb cloud" cutouts from my Bad Day card that were meant to be discarded.  I thought these pieces looked like wonderfully airy and delicate clouds so kept them.  This was a perfect use.  So technically the Indie Art cartridge was used to make this card as well, but clouds are easy to find or make.

When putting this card together, I could not get all the folds of the pop-up flowerbox to behave as instructed.  So I glued the two bottom folds to the floor of the card and it worked.  Perhaps there is a folding typo.  Assemble the flowerbox and all its layers then attach them directly to the front.


Finally, I dotted very small stickle rain drops to complete the light showering rain look.  Viola!  What a masterpiece.

Teacher Appreciate Week Card I

My little boy has 2 PreK Teachers, so I made each their own card design for Teacher Appreciation Week.  Here is the first design.

Umbrella Card
Precut cream colored A2 Card (4x5.5)

Front:
Cricut Cartridge: Everyday Pop-Up Cards
-pg23 Phrase and Phrase Layers: Showering Thanks cut at 1 1/4"
ProvoCraft Slab III: diamond patterned paper
Cardstocks: black, light blue, light green, blue


Inside:
Cricut Cartridge: Everyday Pop-Up Cards
-pg36 Pop-Up: Umbrella cut at 5"
Heavy black cardstock for Umbrella base
Shift Umbrella and Layer 1 cut at 3 1/4
ProvoCraft Slab III patterned paper: water splash pattern, light purple speckles, and darker purple
Presentation Cover clear-gloss poly to make the umbrella shiny and plastic umbrella-like

Assemble the umbrella parts as usual.
I used Zip Dry glue adhesive just around the outside edge to attach the clear layer to the front of the umbrella.  I knew it would be seen, but thought it may add to a "wet, rained on appearance".  That particular glue dries very fast, so I didn't squish it fast enough to create a more spread water effect, but still believe the card is nice.  The glue seen does not take away from the shiny umbrella look I was after.

While the layers do not line up exactly to the pop-up umbrella, they are very close and the slight difference in sizes do not deter from the construction or look.


Here is the side view of the tabs attached to the card back.
Although I used a thick cardstock for the umbrella base, the handle is thin and closing the card causes a slight bend near the curved part.  Just be slow and careful when opening and closing this particular design.

As my first cricut popup card I definately searched for a How-To video online.  I just wanted to make known that this card is not my design, here is the link to the directions and design inspiration I followed, but without the Gypsy.

Thank you to Crafting with Katie for your assistance and making my first pop-up card a beautiful success.
http://www.craftingwithkatie.com/2011/04/umbrella-everyday-pop-up-card-with.html
Thursday, April 28, 2011

Baby Rattle Shaker Card

Wow.  This card turned out better than I ever dreamed.  A friend and coworker just had a darling baby boy so I decided to try my hand at a shaker style card.


Front:
Precut cream colored 5x7 card
Cricut Cartridge: Wild Card rattle (Shift Icon from the Carriage Card) cut at 5.5
Cuttlebug: Swiss Dots
Cardstock: light blue, white, blue, clear-gloss poly (purchased a pack of those presentation binding covers at Office Depot)
Small square pop dots, cut in half
White and blue seed beads
Blue marker
Ribbons: cream and dark blue


To create this card, I actually cut the rattle icon 3 times with light blue, blue and the clear cardstock.  If I had the Gypsy I would have removed the 3 front cuts on the face of the rattle, but luckily the Cricut did not cut completely through the clear sheet.  This concern was just so the beads would not have an escape route.

On the light blue rattle, take your halved pop dots and make a very tight ring around the outside edge of the top circle.  Here is a picture of the circle partially complete.  I should probably have used some version of a pop dot strip instead of hand trimming each little square, but I wanted to use what I had on hand.
Pour the seed beads into the enclosed circle.
Cut the handle off the clear rattle cut and place that on the pop dot ring.
Cut off the handle from the blue rattle then cut out an even circle from the middle of the blue, so that you are left with just a blue ring.  The ring width should just be wide enough to cover the pop dot ring showing through the clear circle.
The rattle portion is now built.  I used just a light blue marker to color the white edges of the pop dots and took some glue to the edge just to ensure the seed beads would not find a tiny hole between pop dots.

Inside:
EK Success Edger: Starry Night
Congratulations stamp
Tim Holtz Distress Ink: Faded Jeans


I thought the whole project looked terrific for a first attempt even if it did take me twice as long to work out all the details.  Luckily, I am confident I can make it much quicker next time.

Wednesday, April 27, 2011

Bad Day Card

A friend was having a really rough time, so I decided to send a Bad Day card with a little pep talk message.  Super simple and really quick to put together.  I really like the quirky images on the Indie Art Cartridge and cannot wait to explore the other cuts.


Front
Precut textured green A2 card
Cardstock: black, dark blue, blue, light blue
Cricut Cartridge: Indie Art to cut the Bomb mushroom
Cuttlebug: Divine Swirls
Green ribbon - I am using a christmas ribbon, you can even sorta see the upside down reindeer, but if you don't know it is there you don't notice on the actual card.  It will be our little secret.


Inside
A brown grenade was cut to play with a Gypsy but in that playtime, the Gypsy was turned off and I have no idea what size was cut, so none of the layers were cut.  I thought that little embellishment went well with this card.

This card made me giggle a little and I hope it brightens my friends day too.

Have a good day all.

Monday, April 25, 2011

More Birthday Cards

Wow.  I had no idea that April birthdays were so popular.  I have 2 more friends that need cards and I thought the Hello Kitty Greetings was just the right cartridge for both.  That little kitten is just oozing cute and she makes me smile everytime I see her.

Outside:
Precut card was cream
Cardstock: Black, white, green, yellow, 2 shades of pink
Cartridge: Hello Kitty Greetings - HK2 cut at 3.5"
Cuttlebug: Swiss Dot
Pop Dots to raise the kitty off the page
Ribbons: cream and bright pink


Inside:
Since an extra flower is created with the same cut as the yellow kitty nose, I just used the flower on the inside of the card and layered other circle extras for the flower center.  No wasting the paper foliage.
HppyBDay in black
Cut the main Clothes layer in light blue.
I tried the shift Clothes layer that gives each letter for Happy Birthday in dark blue, but struggled to get each of the letters to fit right.  I will have to work on that puzzle sometime later.
In the end I just pieced the itty bitty letter middles from the light blue layer to complete the text directly on the black base.

Rinse and repeat to make the second card.

I do believe both of my friends will be pleased to get this in the mail.